Prelude: I’ve included many screen prints in this post and there is a lot of detail that may be interesting to you. Click the thumbnail images for a larger view.
I wrote a story the other day about Frankie-the-Frustrated worker and his frustration dealing with the lack of automatic data entry in his daily work activities. In Frankie’s case I admittedly way over simplified the solution to illustrate the point that technology such as advanced data capture is a reality, yet can still be easy to use. In other words, we don’t have to sacrifice automation for a pleasant user experience or vice-versa. One of the nice AIIM commenter’s on the story rightfully pointed that Frankie would soon be known as Frankie-the-FUDer due to the fact without the all-important “data verification and/or validation” step in the process. Frankie would soon be Feared because of the Uncertainty, as well as, Doubted in the accuracy of data that he was contributing to his organizations business systems. This made me consider that maybe many of us haven’t seen advanced capture software capabilities in action or even know what sort of capabilities are possible with modern technology. Therefore, for this reason, I would like to provide a bit of a deeper drive into what makes Data Capture solutions highly effective and give you very specific details, with many screen prints, so that hopefully we can help Frankie to become Frankie-the-Fabulous worker that he desires to be.
There are several factors that contribute to a successful document capture solution. While each vendor’s exact terminology might vary a bit, the truth of the matter is that the ‘process’ of data capture is quite similar. If you carefully consider each step and how it can contribute to improving data accuracy and quality, you will recognize that there is quite a lot of moving parts to make this “magic” happen. The key point I would absolutely like to stress before this deeper drive into technology is this; so much of this process can be done automatically which is totally transparent to the user. I would like to detail a few techniques so that we can be aware of the technology available to make the user experience the best it can be. Once the system is configured for production then all the user has to do is basically capture images and verify data which translates directly into a very easy and simple experience for the users themselves.
The logic of Automatic Data Capture
The very first thing to do when considering designing an effective Data Capture solution has nothing to do with the technology itself. An absolute, must-do, critical step that you will hear from all the experienced professionals in the capture business is to gather as many document samples as you possibly can. Gather all the different types of documents you wish to capture such as invoices, agreements, surveys or whatever, but gather as much volume and as many varieties as you can. Also, do not just gather high quality original documents that someone might have just printed on a pristine piece of paper from the laser printer in the office. Gather the ones that that have been in filing cabinets for years and ones that have coffee stains with wrinkles. The idea is that you want documents that are going to represent a true production Data Capture environment.
Initial document analysis and index fields
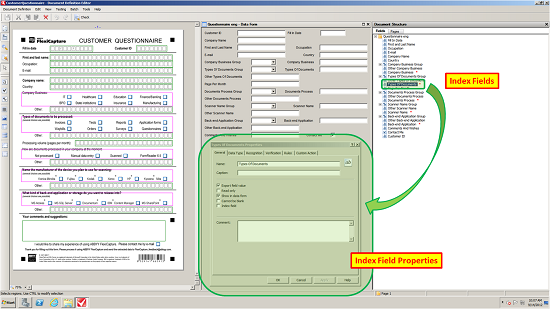
After gathering as many documents as you can then the first step in configuring the Data Capture solution is to import the sample documents. Scan them at 300 dots per inch (300 dpi) which is the optimal output resolution for automatic recognition accuracy. Next, you will want to run an initial document analysis on your documents. In this analysis the software will make its best guess on the structure of the documents. You should not expect that this analysis will be absolutely perfect but in many cases this step can do a good portion on settings up your solution that typically took a lot of time and effort. As seen in the screen print below (click the image to zoom) the software can automatically detect form fields such as “First and last name” and draws an extraction zone around this particular area. The software can also detect Groups such as the “Company Business” and automatically create index fields for all the available options in this group (i.e. “IT, Healthcare, Education”, etc.) So after the initial pass you will want to check each field and apply some logic to improve the accuracy of the data captured and there are many useful techniques as you will see below.
Useful tips and tricks to improve data capture accuracy

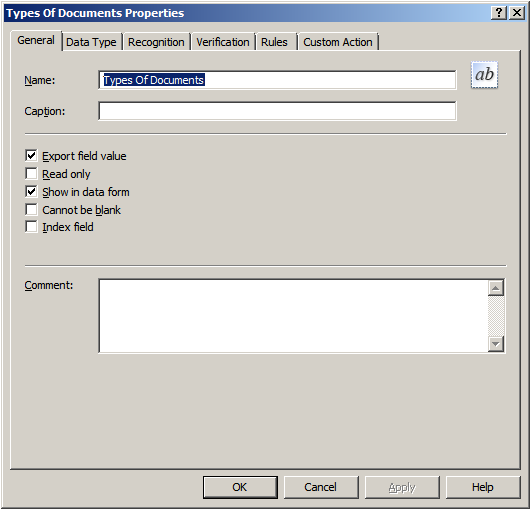 General General
From the General tab in your data capture application you can provide a useful field name for each individual field you wish to extract data. This configuration tab will allow you to decide such basic functionality such as if the field is Read Only or Cannot be blank. Also, you can decide whether to Export field value because sometimes you might wish to recognize some information such as a line item amount but do not wish to export the line item, just overall total amount. The most commonly used functionality is enabled by default. |
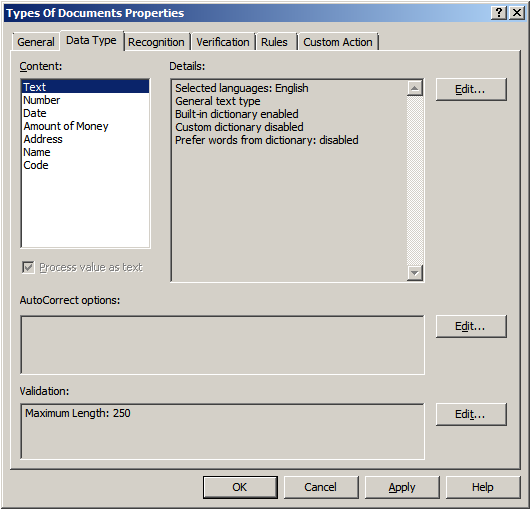 Data Type
The Data Type configuration is an extremely valuable function to allow for field-level recognition accuracy. For example, if the field is a Number only field then you can enforce the recognition to only output numbers. Or if the field was an Amount of Money then you can enforce an output in the form of an amount. You can also add custom dictionaries and other useful validation rules
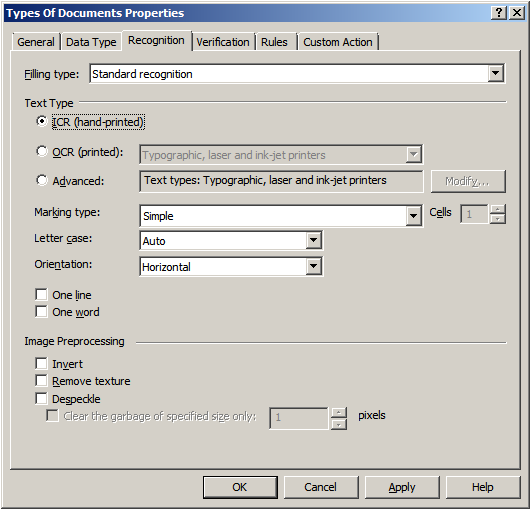 Recognition
This is the area were you would fine-tune character level accuracy. In the Recognition tab you can select which type of recognition you wish to perform on a certain field whether it might be Intelligent Character Recognition (ICR) for handwritten text, Optical Character Recognition (OCR) for machine printed text or even the font type. The more information that is known about your documents, and if you can apply that logic to your capture system, will make the overall accuracy much greater.
 Verification
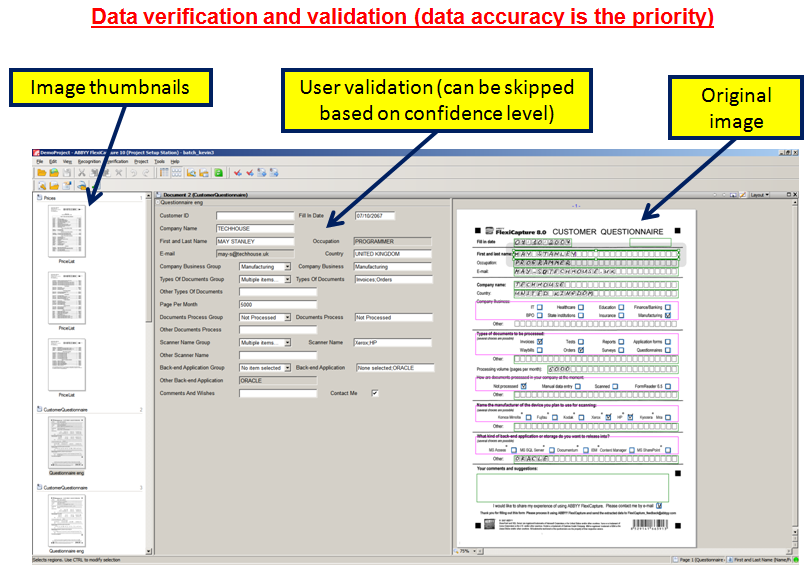
While pure processing speed of getting images captured and recognized is important, the importance of uploading accurate data is often the most important consideration in a data capture solution. So, therefore in an effective data capture solution there is a “verification” step in the process where you can set certain character confidence thresholds. If these thresholds are not met then a human will view and/or correct the data, if needed.
 Rules
Rules
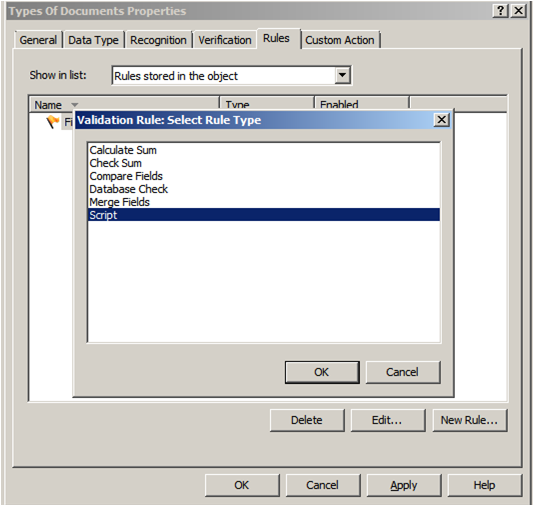
This is one of the most critical-steps in the data capture process. With Rules configuration options, this is where the Data Capture system starts to use logic, and lookups into other systems, to compare data fields for any contradictions in the data captured. For example, just imagine if a Social Security Number was captured incorrectly by one digit. The system can do a Database Check and look into a different system to check the SSN based on a different field such as Mailing Address. In this case if there was a mis-match then the user can easily and quickly correct the data before sending to the back-end repository. Another great example is to read line item amounts from an invoice and then use the Check Sum option to validate that the total amount is equal to all the line items combined. This is incredibly effective to catch any potential errors BEFORE they are committed to a system.
Custom Action
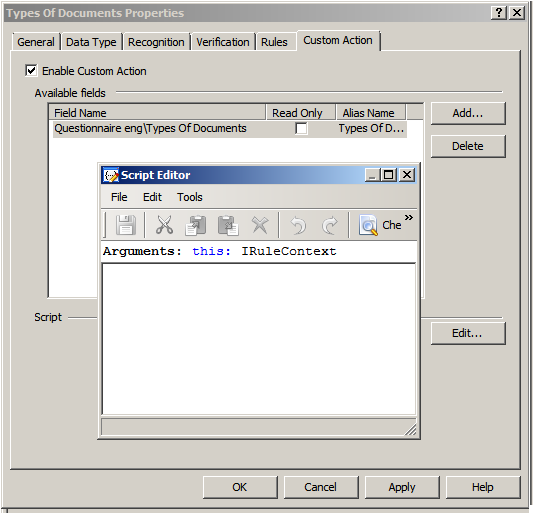
When standard capabilities or functions just aren’t enough, or if your business process dictates customization, there are options to incorporate custom scripts. User scripts are custom scripting rule triggered by the user when viewing a field during field verification or in the document editor. The script is triggered by clicking … to the right of the field value. To make the creation or modification of the scripts simple, there is a script editor available directly in the data capture configuration interface.
Putting it all together (Data Capture from the User Perspective)
 Now that we’ve taken a look at a few of the ways to improve the quality of data in your Data Capture solution, hopefully you can have a greater appreciation for how all the moving parts can make this type of system highly accurate. These configurations are typically setup by system administrators or persons with specialized training. However, what really drives adoption of a particular technology for mass appeal and high adoption rates is a pleasant user experience. So, therefore, what I would like to do is show, in a few screen prints, how simple all this advanced technology is to use from the User Perspective. Please note that the screen prints might vary depending for many factors including hardware capture device, processing/verification user interface design and/or the ultimate storage destination.
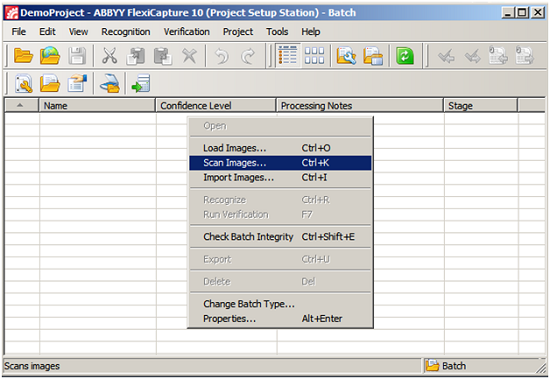
- Step # 1 – Capture images
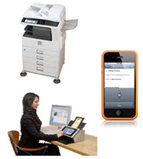
o This can be from a dedicated scanner, multifunction peripheral or even a mobile device with camera. In the screen print below this is the simple desktop capture interface. As you can see I can ‘Load Images’, ‘Scan Images’, ‘Import Images’ or the capture system can be configured to automatically process images from shared folders, FTP sites or other sources. So, you can just imagine that the Data Capture solution can be setup in a way that can process images from any device at any time. Again, making the user experience to contribute images very easy and accessible from anywhere.
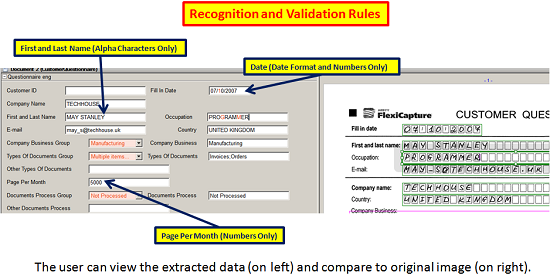
- Step # 2 – Verify data for accuracy
o After the first step of capturing the images themselves, the images are run through all the recognition rules, validation steps and/or database lookups to provide the highest quality of data possible on the first-pass. But, as I said earlier, it is not always possible to achieve absolute perfection for many reasons so you will want to have the user “verify” the results if the data did not meet a particular threshold of confidence or there was other exceptions. Please note that the user interface screen print below is from the desktop version of a verification station but you can imagine that this could just as easily have been optimized for other devices such as touch screen interfaces or even mobile devices.
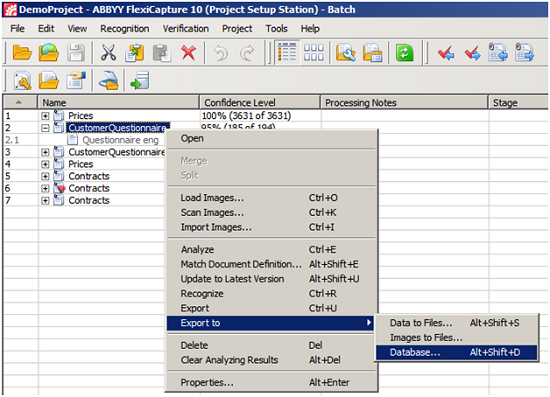
- Step # 3 – Export to database
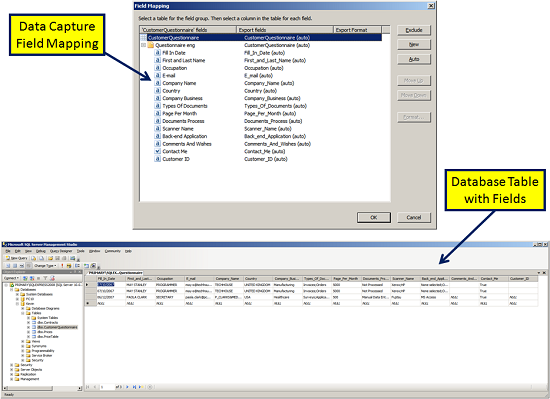
o Lastly, after the user has checked that all the extracted data is accurate then they can simply export the quality data to the database. Of course, these export results then can set off a whole series of workflow events based on what the back-end systems capabilities might be.
Confident data capture for everyone
As I illustrated, Data Capture from the user perspective can be quite simple. There are many additional techniques and tricks that you can use but I wanted to cover some of the standard ways to achieve highly accurate Data Capture results. The end result is beautifully accurate, as well as useful, data in your database. This will give the organization a high level of confidence that adherence to business policy, enforcement of business rules, in addition to the users themselves trusting the system to be accurate when they are looking for information helps to create overall efficiency.
In summary, Data Capture has progressed to the point that it can nearly be totally automated but there are many variables involved that still make human “data verification and/or validation” necessary at certain times. The quality of data input it your system should be the priority, not the sheer volume. With a little planning and using modern tips and tricks to achieve highly accurate Data Capture results you can realize both benefits of accuracy and speed. Then Frankie-the-frustrated will truly be given the adequate tools to become Frankie-the-Fabulous to ‘Capture…with Confidence’.
 I’ve been a casual “Apes” fan for decades but never truly a hard-core fan because of the mindless plots or poor costumes that were obviously fake. They were always entertaining for me a bit but I quickly got bored with most of the movies of series.


